
An estimated 3 million people in the United States have dental implants—a number that is growing by 500,000 every year. (1) For those who have lost one or more teeth, dental implants are a healthy option due to the way they bond with natural bone to effectively support replacement teeth. Dental implants also offer the added benefit of allowing replacement teeth to look, feel, and function like natural teeth.
Cleaning and caring for dental implants are keys to prolonging their appearance and functionality. Failing to properly care for your dental implants can increase the risk for peri-implantitis—an inflammatory condition that affects the soft and hard tissues surrounding implants. When left unaddressed, peri-implantitis can lead to loss of bone and the dental implant. However, cleaning your dental implants regularly can help you minimize your risk for peri-implantitis, and maintain a bright, healthy, and attractive smile for years to come.
Here is a detailed guide on how to clean dental implants, along with extra tips on how to prolong the life of your implants.
How to Clean Single Implants
1. Use a Soft-Bristled Toothbrush
Soft bristles are less likely to damage your gums or cause bleeding and are just as effective as medium or hard bristles at removing tartar and plaque. Electric toothbrushes are shown to disrupt and remove bacteria from teeth more effectively than manual toothbrushes due to the way they generate a higher number of brush strokes than the human hand. (2) Regardless of whether you choose an electric or manual toothbrush, make sure it has soft bristles.
2. Brush at Least Twice Per Day
Brushing in the morning after you wake up eliminates morning breath and removes bacteria that has built up in the mouth overnight. Brushing in the evening before bedtime helps remove bacteria that has built up throughout the day and reduces the risk for plaque buildup and decay overnight. Many dentists encourage brushing after every meal, or anytime during the day as needed to remove food debris and bacteria.
3. Use a Water Flosser
Also known as an oral irrigator or dental water jet, a water flosser disrupts and remove bacteria in pocket depths that measure up to 6 mm deep. (2) Many water flossers come with rubber-tip stimulators and other attachments designed to accommodate sensitive gums and effectively clean hard-to-reach areas between teeth. Many dentists recommend water flossers over dental floss, since some brands of floss can shed particles that contribute to peri-implantitis. Be sure to use the water flosser first since you don’t want to blow away the fluoride toothpaste that is introduced during brushing and flossing.
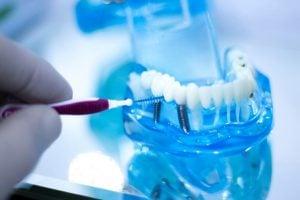
4. Use Crown and Bridge Floss
Crowns and Bridge floss is specially designed to scrub under and around dental implants. It has two stiff nylon ends and a fuzzy middle which gently cleans the dental implant surface and the porcelain that touches the gumline. The stiff ends enable you to insert the floss between the dental implants at the gumline and pull it through to the other side. You can then lean it against the implant surface and rub it side to side. It’s a good idea to use this floss after brushing while the toothpaste residue is still in your mouth. This enables you to distribute the fluoride around the implant, which helps prevent unwanted bacterial growth.
5. Use Low-Abrasive Toothpaste
Use toothpaste that lacks abrasive ingredients such as baking soda or stain-remover agents, since these ingredients may wear on acrylic and remove glaze from porcelain implants. Look for toothpaste specifically made for use on dental implants, or ask your dentist for toothpaste recommendations.
6. Brush Under and Around the Dental Implant Crown
Bacteria and plaque may accumulate under and around the implant crown to increase the risk for peri-implantitis. To reach these areas, try using an angled-neck toothbrush or an interdental brush with a slim head—especially if your implant is located at the back of your mouth.
How to Clean All-on-4 Implants
The steps for cleaning all-on-4 dental implants are the same as those for cleaning single-tooth implants, with a few additional considerations to keep in mind. With all-on-4 implants, food particles can easily become trapped between the base of the bridge and gum line to increase the risk for infection.
Here are some additional steps when cleaning all-on-4 dental implants:
7. Follow Steps 1 to 6 above for Cleaning Single Implants
All-on-4 dental implants are made of the same materials as single implants, and must be cared for in the same way using a soft-bristled toothbrush and water flosser, and brushing at least twice per day using nonabrasive toothpaste. All-on-4 implants make up one full arch of top or bottom teeth, in four separate implants. Therefore, extra attention must be paid to removing food debris that gets stuck between the bridge and gum line.
8. Use a Rubber-Tip Stimulator
Most water flossers come with rubber-tip stimulators that can gently remove food particles that become trapped between the bridge and gum line. Use this attachment on your water flosser at least once per day to remove food debris and bacteria from all-on-4s. Stick to using the medium or low settings only, since the high setting may separate tissue from the implant, in some cases. (3)
9. Use a Sulcus Brush
A sulcus brush is roughly one-third the width of a regular toothbrush and is effective at cleaning the part of the bridge that transitions to soft tissue. Many patients with all-on-4s report that a sulcus brush makes their dental implant care routines much easier.
How to Clean Overdentures
1. Brush Overdentures Daily

Use a denture brush to gently brush the underside of your overdentures at least once per day. A denture brush usually has two heads: a soft-bristled flat head for smooth surfaces, and a single-tuft head with tapered bristles that can access hard-to-reach areas. Brushing your overdentures daily will help eliminate bacteria that has built up inside the dentures throughout the course of the day. Use a non-abrasive soap such as dish soap or specifically designed denture cleaners. Don’t use toothpaste since it can potentially scratch the surface of the overdenture causing a dull finish.
2. Soak Dentures Overnight
Every night before you go to bed, place your overdentures in a cleaning solution made specifically for dentures, and soak them overnight. This will keep your overdentures especially clean, and may also help them retain their shape. Follow the instructions on the cleaning solution to avoid compromising the functionality and lifespan of your dentures.
3. Rinse Thoroughly with Water
Rinse your overdentures thoroughly with water before placing them back into your mouth. This prevents loose particles and bacteria from accumulating inside the dentures, and reduces the risk for side effects such as pain, burning, and vomiting after the overdentures have been soaked in cleaning solution.
4. Inspect Your Overdentures Regularly
Inspect your overdentures carefully every day to make sure o-rings, locator caps, and clips are in place and in good condition. Consult your dentist immediately if any of these parts look worn or are missing.
5. Replace O-Rings, Locator Caps Annually
Many dentists recommend replacing o-rings and locator caps on your overdentures once per year to maintain their efficacy and lifespan. Ask your dentist how often these parts on your dentures should be replaced to prevent any problems or complications. If for any reason, an attachment becomes loose or you are having trouble putting the overdenture in, contact the dentist immediately. Sometimes an attachment will fall out and a loose-fitting overdenture can cause harm to the other properly seated attachments. Other times, an attachment gets damaged due to the patient biting down on the overdenture to seat it. DO NOT BITE your overdenture into place as it may ruin an attachment, abutment or the complete overdenture. Use your fingers to gently insert straight onto the abutments or bar.
Extra Tips for Prolonging the Life of Dental Implants
Dental implants and overdentures cannot decay, but your gums and supporting bone remain subject to bacterial decay, inflammation, and infection without proper dental implant care. Also, deep cleaning dental implants regularly is necessary for prolonging their lifespan.
Here are additional tips that can help prolong the life of your dental implants:
- Visit your dentist regularly for deep cleaning. Regular dental checkups and professional cleaning allow your dentist to confirm that your implants and overdentures are functioning properly, and that you are maintaining good oral health.
- Avoid abrasive cleaning products. Stiff- or hard-bristled toothbrushes, baking soda, and strong cleansers are examples of abrasive cleaning products that may permanently damage your dentures.
- Avoid using bleach and chlorine cleansers. Oral products that contain bleach may weaken dentures and change their color, while chlorine-based solutions can tarnish and corrode the metal parts of dentures and implants.
- Avoid hot water. Soaking overdentures in hot or boiling water can warp the shape of your dentures.
- Avoid chewing on hard items. Ice cubes, hard candies, and pencils are examples of items that may break your crowns or damage dentures.
- Seek treatment for teeth grinding. Teeth grinding, also known as bruxism, can put excess pressure on dental implants and dentures to cause lasting damage.
- Stop smoking. Smoking can weaken and inflame the gums, and can stain dentures and crowns. Stop smoking immediately, and ask your doctor about effective smoking cessation interventions if you need help quitting.
Sarasota Dentistry offers a range of affordable dental services including cosmetic dentistry, dental implants, and dentures. Call us today at 941-929-7645 or fill out our contact form to learn more about our many services and treatment options.
Sources


